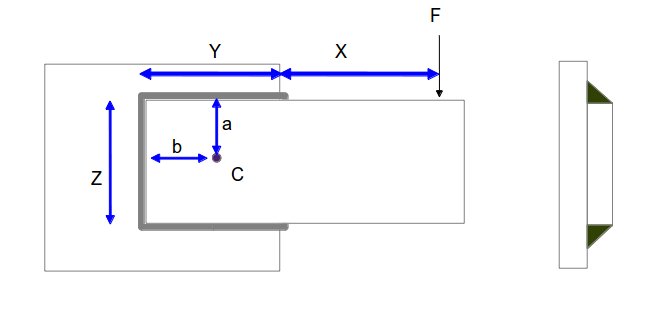
The overall procedure explained in the weld design calculation for bending article will holds good in this article as well with only major difference is the use of polar moment of inertia (J) instead of the area moment of inertia (I) since we are talking about torsion here.
Bit confusing? Well, we are going to understand the procedure in detailed step by step manner here with the following example:
Problem statement: Look at the design of the welded connection below, its a cantilever kind of structural joint where the fillet welds are subjected to the torque developed due to the load F. Calculate the fillet weld size required for the application.

Given,
F= 20000 N
X = 200 mm
Y = 150 mm
Z=100 mm
Solution:
Step-1: Calculate COG: Find out the centre of gravity (COG) of the whole fillet weld joint scheme. In the example above, we have a rectangular shaped weld area. So, obviously, the COG will be at the intersection of the two diagonals of the rectangular. And we can locate the COG , which is marked as C, as below:
a=Z/2=50 mm
b = Y/2 = 75 mm
Step-2: Calculate the unit throat weld area (Au): The unit throat weld area for the example problem is:
Au= 2*(Y+Z) = 2*(150+100) = 500 sq.mm
Step-3: Calculate unit throat polar moment of inertia (Ju): The polar moment of inertia of any shape is the sum of the area moment of inertia of the shape about the XX axis and that of the YY axis. The shape of the welded joint, in the above example, is rectangular in shape with two sides as Y and Z respectively.
The equation for calculating the (unit throat length) polar moment of inertia for rectangular shaped fillet welding connection is,
Ju=(Y+Z)3 /6=(150+100)3 /6 = 2604166.66 mm3
Step-4: Calculate design strength (Pw): The design weld strength for the material can be calculated using the eq.2 as:
Pw=0.5*fu= 0.5*430 N/mm2= 215 Mpa
(Assuming ultimate tensile strength of base material as 430 N/mm2)
Step-5: Calculate max. Direct shear stress in vertical direction ( τsv) : Maximum direct shear stress developed in the welded joint to be determined as:
τs=F/Au=20000/500 = 40 N/mm2
Step-6: Calculate max. Torsional shear stress in horizontal direction at any corner ( τth) : The reason why the corner point of the weld is chosen is: the torsional shear stress will be maximum at the corner because the distance between the corner point and the COG of the section is maximum.
The torsional shear stress, in general, can be found from the equation:
τt = (T*r) / Ju……………………………….eq.a
where,
T = applied torque = F*[X+(Y-b)]=20000*[200+(150-75)]=5500000 N-mm
(refer the picture above)
r = Distance between the point of interest on the weld and the COG of the section
Now, in case of horizontal torsional shear stress at any corner,
r = a = 50 mm
So, from the eq.a:
τth= (T*r) / Ju = 5500000*50 / 2604166.66 = 105.6 N/mm2
Step-7: Calculate max. Torsional shear stress in vertical direction at any corner (τtv) : The above eq.a will be used again here:
In case of vertical torsional shear stress at any corner:
r = b = 75 mm
So, from the eq.a:
τtv= (T*r) / Ju = 5500000*75 / 2604166.66 = 158.4 N/mm2
Step-8: Calculate the Resultant shear stress at corner (τ):
Resultant shear stress (τ) = √ [(total horizontal shear stress)2 + (total vertical shear stress)2]…………………………….eq.b
For the above example,
Total horizontal shear stress = τth= 105.6 N/mm2
Total vertical shear stress = τsv + τtv = 40 + 105.6 = 145.6 N/mm2
So, from the eq.b,
Resultant shear stress (τ) = √ [ 105.6 2 + 145.6 2 ] = 179.86 N/mm2
Step-9: Calculate the weld throat size (t): Use the eq.6 from the previous article here:
t= τ/Pw =179.86 / 215 = 0.83 mm
Step-10: Calculate weld leg size (L) : Use the eq.7 of previous article as below,
L=1.414*t = 1.414*0.83 = 1.173 mm
Finally, we obtained the required weld size (leg length) as 3 mm ( next to 1.173 mm as calculated) as the result of the fillet weld design calculation example. The calculation is done based on the weld stress method discussed in BS 5950.
Hi, I am Shibashis, a blogger by passion and an engineer by profession. I have written most of the articles for mechGuru.com. For more than a decades i am closely associated with the engineering design/manufacturing simulation technologies. I am a self taught code hobbyist, presently in love with Python (Open CV / ML / Data Science /AWS -3000+ lines, 400+ hrs. )

there is a mistake in the calculation of weld inertia. L should be 100+2×150
” there is a mistake in the calculation of weld inertia. L should be 100+2×150″
Hi,
Sorry for my late reply. It will be great if you elaborate what you mean to say here.
” there is a mistake in the calculation of weld inertia. L should be 100+2×150″
Hi,
Sorry for my late reply. It will be great if you elaborate what you mean to say here.
can you elaborate more on why we pick 3mm (next to 1.173mm as calculated)? Why not 2mm? Thank you.
hello, for the Au calculation, why Au=2*(100+150), not Au=100+2*150, because there are totally 3 weld line, two length is Y, and another length is Z.
total vertical shear stress is 158.4 + 40 = 198.4